Find Me On Social Media

Thursday, March 26, 2015

bareMinerals Complexion Rescue and Up Close and Beautiful Complexion Starter Kit !!

Hello, beauties!!!

Welcome back to Beauty by Bracco. I hope you've all been having a great week!

As I mentioned in Monday's skincare post , my skin has been recovering from a bad reaction to an exfoliating mask. I've recovered quite a bit, but I'm still suffering from a teeny tiny bit of texture and redness. It doesn't help that Mother Nature is prepping my skin for her monthly visit, ifyouknowwhatImean. Just keeping it real, ladies! We're all friends here!

With all of that being said, I've been laying low on the makeup applications, and letting my skin breathe. I haven't really been wearing makeup, but if I do decide that I want to look a little more fresh, covered, and alive, I've been running to my bareMinerals! I own the bareMinerals Original Foundation Broad Spectrum SPF 15. I wear Fair for those who are wondering, because I am Casper's sister. I just LOVE this foundation. It's lightweight, allowing your skin to breathe, but it still provides your skin with beautiful natural-looking coverage. And, in my opinion, it's a great product for $28.00 because it is a loose powder foundation, and I find that those tend to last quite a long time.

So, I've been using this foundation as my go-to for the last two or three weeks (even before I had the bad reaction) and it inspired me to go out and buy some more bareMinerals goodies that I've had my eye on!

*Drum rolls* I purchased the bareMinerals Complexion Rescue, and the bareMinerals Up Close and Beautiful 30-Day Complexion Starter Kit from Sephora!! 

*Sidenote: You can purchase bareMinerals products at retailers such as Ulta, QVC, bareMinerals.com, Amazon, but I personally purchased mine from Sephora* 


Let's start with the bareMinerals Up Close and Beautiful Starter Kit! As you all probably know by now, I love me a great kit for a great price! When there is a great kit like this from a brand that I love such as bareMinerals, I'm sold! I felt this was the perfect time to finally purchase this kit that has been sitting on my list for a while now, due to my current skin issues.

bareMinerals is such an amazing brand because of the natural glow its products give your skin. This kit is a loose powder kit (not including the primer, obviously) and it is perfect if you want full coverage, but you don't want to have to cake on the makeup to get a flawless complexion. Plus, hellooooo!! SPF is included in their products. Protecting the skin from the suns harmful rays is SO important for skincare.

Here's what it looks like, before we dive into what this kit includes. There are several shades to choose from, I chose to go with the light, for it works well when I'm pale, and when I get a little color in the summer months.


This kit includes:


  • 0.5oz  Prime Time Foundation Primer
  • 0.03oz Original Foundation Broad Spectrum SPF 15
  • 0.02oz Concealer Broad Spectrum SPF 20 in Summer Bisque
  • 0.03oz Mineral Veil Finishing Powder
  • Mini Full Flawless Face Brush
  • Mini Concealer Brush
That. Is. A. Fabulous. Deal. All of this is a $74.00 value, but it is sold at Sephora for ONLY $22.00!! 

They are obviously smaller than the usual normal sizes of these products, but I promise, loose mineral powder cosmetics last so long! And for just $22.00? 6 award winning and signature products- I cannot get over it! 

Next up, we have the bareMinerals Complexion Rescue


This product really intrigued me, and I'd had my eye on it for a while. While I was already in the bareMinerals section of my local Sephora picking up the Up Close in Beautiful kit, I decided to finally snag this up as well! 

This is a Tinted Hydrating Gel Cream that combines skincare benefits and naturally radiant coverage in one! Umm, yes please. It costs $29.00 at Sephora. Not too bad for a 1.18floz product, especially when you don't need a lot with each use!

It's a mineral based formulation that combines the best parts of BB and CC creams, and a tinted moisturizer to improve skin hydration. It leaves a dewey sheer-to-medium coverage for radiant, smooth, and healthy skin appearance. It also contains botanicals and antioxidants to protect skin form harmful outside stressors, and lock in moisture to keep the skin hydrated. 

I think this product, along with the above kit, is great for the spring/summer when we want to have coverage but don't necessarily want to wear a lot of makeup in the warmer temperatures. Personally, I enjoy allowing my skin to breathe with lightweight products in the summer time, and I really look forward to using both of these products to do so.

I also love that the shades seem to be very forgiving. There are 10 shades, but when I was testing swatches at Sephora, I was able to match Opal 1, Vanilla 2, and Buttercream 3 very well. Opal would be my usual skin as Casper's sister, but Buttercream was just slightly darker on me for when I get a little tan in the summer. I ultimately decided to get the Vanilla because it was the perfect in-between. So I have the best of both worlds. 

And there you have it! I hope you give these a try, and as always, feel free to let me know how you feel about them and if you have any other products you'd suggest I give a try! 

I will have a new post up on Saturday! Until then, stay beautiful!!
Christina Bracco
xoxoxoxo

For PR inquiries, questions, comments, concerns, please contact: Christina.f.b@aol.com or fill out a Contact Form in the sidebar! 

INSTAGRAM  <---- CLICK AND FOLLOW ME HERE!!

TWITTER <---- CLICK AND FOLLOW ME HERE!! 


Monday, March 23, 2015

Skincare Secret: Benefits of Honey!!

Welcome back, beauties!!

I'm so, so sorry I've been slacking in the post department. Things have been cray cray and I just haven't found the time. Things have calmed down, it's a new week, soooo I'm back! I've been making tons of purchases lately (Such a bittersweet sentence, haha!) and so I'll be pumping out the posts this week!

I've mentioned in previous skincare posts that I have acne prone skin. My skin had been doing amazingly well lately. I had not a blemish on it. This is a rare thing for me, and I was LOVING it. I mean, who wouldn't? Unfortunately, that all went down the tubes when I had a very bad reaction to the GlamGlow Youthmud TINGLEXFOLIATE Treatment. It wasn't so much breakouts ( I did get a few cystic breakouts) but it was more so hives.

I'm not exactly sure WHAT was going on, but all I know is it looked like World War III broke out on my face. It has not been pretty.

SO, I've been spending the last week trying to just calm my skin down and get it back to normal. I've still got a bit of texture in some spots, but it's mostly redness that I'm dealing with now. Because of this, I've had to bust out my secret skincare power tool that many, many people find me weird for going to on a regular basis.

Raw Honey! 


Yes, I mean raw honey that comes in the little bear-shaped tube that you use for baking, or to put into your tea, etc. etc. There are so, so, so many skincare benefits of honey, it does absolute wonders. It's important to note, when purchasing your honey, make sure you're purchasing "raw", "natural", "pure", or "organic" honey to ensure that it's in its most natural form. 

First, let's talk about why raw honey is so amazing for skincare.

  • It is full of antioxidants, making it a secret agent in fighting aging. 
  • Honey is EXTREMELY moisturizing and soothing, giving your skin a beautiful glow.
  • It unclogs pores!
Here are my favorite benefits of honey:


  • It's a natural antibacterial, therefore, it's amazing for treating acne, as well as preventing it. 
  • It protects against skin damage. 
  • Promotes wound healing.

  • These are all such beneficial properties when it comes to fighting acne, and healing/soothing your face after suffering from the smallest or the largest breakouts. 

    When I have a breakout, or a bad reaction to a skincare product like I did recently, I go straight for the honey. If I break down and pop/pick at the breakouts and my skin is inflamed, red, bumpy, and irritated beyond belief, honey is the magic cure. 

    How do I use it to heal my skin? 

    After cleansing my skin, I splash some water on my face and pat any excess water off with a towel. Just leave your skin a little damp so the honey is a bit easier to apply. Then, take a generous amount of honey in the palm of your hand, and simply apply it as you would a mask all over your face. You will look extremely weird, but it's very worth it. 

    The amount of time you leave the mask on varies depending on the severity of your skin. If you just want a quick mask, leave it on for about 15 minutes, a little more: 20 minutes, if your skin is in really bad shape: an hour. 

    I normally leave my mask on for an hour, sometimes more if I get caught up doing things. After an hour, I simply wash it off and all of my redness, inflammation, and irritation is absolutely GONE. It's amazing how quickly your skin clears up within just an hour. 

    You can also use it as a simple spot treatment for smaller breakouts. Just put a little swab right over the breakout and leave it on for a while, or sleep with it if you don't mind possibly getting your pillowcase a little sticky, haha!

    There are so many more benefits of raw honey. For your hair, for your cuticles, for sunburn damage, etc. etc. 

    I strongly recommend trying honey! It's changed my skin! It's really been helping me after my poor reaction to the exfoliant. Also, look up different ways to use honey! As a cleanser, a hair treatment, a natural exfoliant: I mainly use it as a mask/spot treatment, so I can't speak on the others, but I'm sure they're just as amazing to give a try. 

    If you're going to give it a try, let me know! I hope I've inspired you. And if you have any odd skincare secret weapons against breakouts, let me know! I'd love to hear them and give them a try! 

    I will be back Wednesday with another post! I promise! 
    Until then, stay beautiful,
    Christina Bracco
    xoxoxoxo

    For PR inquiries, questions, comments, concerns, please email: Christina.f.b@aol.com or fill out a Contact Form in the sidebar. 

    INSTAGRAM  <---- CLICK HERE AND FOLLOW ME!!

    TWITTER  <---- CLICK HERE AND FOLLOW ME!!

      Friday, March 13, 2015

      Beauty Tip: Palette Display/Storage Idea!!

      Welcome back, beauties!!

      I've missed my beauty blogging so much, but I had to take about a week and a half off due to some personal family matters, but I'm back! And I'm bringing you what I feel is a really great idea for those who love palettes! Story time...

      I love palettes. Whether they be Color Correcting palettes, blush palettes, contouring palettes, or (my fav) eyeshadow palettes... I do not discriminate when it comes to palette loving. A girl can NEVER have enough palettes. Or makeup in general. Or shoes. You catch my drift :)

      Due to my love of palettes, over the past few months, I have accumulated an overwhelming amount of them... mainly, eyeshadow palettes. I had been storing them in a Travelon drawer organizer-esque type contraption (I'm not exactly sure what it is, I received it as a gift for Christmas, lol!), but the more I purchase, they simply do not fit there anymore.

      SO, over the weekend, I was on a serious mission to figure out how to store my palettes, but still have them easily accessible and visible, in my limited space. I tell ya, the day I have enough space to purchase a huge vanity table to have all of my beauty goodness displayed upon will be the happiest day of my life thus far.

      Anyway, after discovering that no palette-storage-type inventions have come to light, I remembered something I had seen in a recent video by beauty vlogger, Jaclyn Hill! (Seriously, go check her out.) She had a few palettes stored in a CD organizer. What a great idea! The only problem is, I could not find a single CD organizer that fit the bill. On top of that, I have no Container Store near me, so I am unable to enjoy that organizational heaven.

      And then, it was as if a unicorn struck me in the head with its rainbow horn, a letter/paper storer! You can find these anywhere. They're perfect for storing numerous  palettes in an organized manner, and depending on where you purchase one and what type you purchase, they're SO affordable.

      I purchased a CEP Isis 3 Step Letter Sorter in Crystal on Amazon.com. It was $17.00 with free shipping because I have Amazon Prime. When I received it in just two days, I was so excited to organize all of my palettes in it, and I was not disappointed. It displays them BEAUTIFULLY.


      Depending on length, width, and thickness of the palettes, you can fit a pretty large amount! I have all 9 of my palettes displayed on mine, and I can easily fit another three if I stand up the Kat Von D and Chocolate Bar palettes! 


      The Letter Storer itself takes up little to no space on my dresser top, and it looks so beautiful next to my perfume tray and nail polish storage. Such a perfect girly touch with all of the palettes so visible and easily accessible when time comes to beautify myself.

      Here's a side shot so you can see with width of the slots. They can easily fit very slim palettes, or very thick ones like the Chocolate Bar or the Urban Decay Naked Palettes. 

      I feel like the Chocolate Bar looks like it's hanging off the front in this shot, but that is because that front shelf curves. I can assure you it is resting comfortably there and fits perfectly!

      So there you have it! A fun little beauty tip I wanted to share for those struggling with storage, or just want a beautiful and inexpensive way to display their favorite makeup palettes. Let me know if you're going to give it a try, and please share any of your organizational ideas with me in the comments, or by filling out a Contact Form in the sidebar! 

      Thank you for all of your support! I'll be back on Monday with a new post. Enjoy your weekend! I'm going into Manhattan to see a Broadway show tomorrow. It's one of my favorite things to do EVER! I hope you're all doing something fun as well. Until Monday!

      Stay beautiful, 
      Christina Bracco
      xoxoxo

      For PR inquiries, questions, comments, suggestions, please email: Christina.f.b@aol.com or fill out a Contact Form in the sidebar. Thank you. 

      INSTAGRAM <--- CLICK AND FOLLOW ME HERE!!

      TWITTER <---- CLICK AND FOLLOW ME HERE!!

      Tuesday, March 3, 2015

      Sephora Beauty Haul: Too Faced Cosmetics, Josie Maran Cosmetics,Anastasia Beverly Hills, Marc Jacobs, Philosophy!

      Welcome back, beauties!!

      I've been so, so, SO busy these last couple of days, but I made certain that I squeezed in this post, especially since I was able to squeeeeeeeeze in some shopping!

      So today's post is a little Sephora haul that I did over the weekend. I'm really excited because everything in this haul is a new product to me! They're all beauty products I've never tried before! WEE!


      Don't you just love seeing that black,white, and red? It warms my heart, haha.

      My advice to you: NEVER go into Sephora in the middle of a weekday. They're not busy. They will latch on to you. They will convince you to purchase everything you look at. So, as you can see by the two medium-sized bags, I totally made friends with one of the lovely gals that works in my local Sephora, and she helped me do some damage.

      Everything I purchased was on my "Loves" list on Sephora.com, so I have been eyeing these products for a while, she just convinced me to get them all... at the same time. GIRL!


       It may not look like much, but my wallet sure thought it was enough, thank you very much!

      So, first up, I happily purchased the Josie Maran Creamy Concealer Crayon in shades Light 1 and Medium 2.  

      Left: Light 1 / Right: Medium 2

      I purchased this concealer crayon because I've heard many good things about it. The concealer is perfect for covering up dark under eyes, and any blemishes and dark spots on your face. It's so creamy, and so smooth. It glides on your skin like butter. Because the crayon, along with all Josie Maran products, is infused with pure Argan Oil, it's so hydrating and nourishing. 

      I originally purchased the concealer crayon in Light 1 just for concealing my under eyes, but I actually went back the next day and picked up Medium 2, due to the new "Contour Like Josie Cat" campaign the brand just introduced. Contouring is hugely popular, and cream contouring is becoming a new fav among beauty lovers. Just purchase your usual light shade for your concealing and highlighting, and then purchase a shade one or two shades darker than your skin for your contour. I've been doing powder contouring, but I thought I'd give cream contour a try, and at $20.00 a concealer crayon, Josie Maran Argan Concealer Crayons are a much more reasonable price then other cream contour kits and products. I haven't tried cream contouring with these crayons yet, but I do have full intentions on doing a blog review/tutorial of it!

      Next up, I finally purchased the Too Faced Hangover RX Replenishing Face Primer!

      Check out those results on the back of the box!

      I've been wanting to purchase this primer for such a long time, but always held off due to the price. I've heard SO many amazing things about this primer from some of my favorite beauty vloggers, so I've been itching to get my hands on it. The amazing thing about this primer is that it is a primer and moisturizer in one! You don't need to use any moisturizer before you start doing your makeup. This primer takes care of moisturizing and hydrating your skin for you! A two in one! This primer is infused with Coconut Water, hence, the moisturizing feature, and Electrolytes and Probiotics. So the bottom line is... this primer is VERY good for your skin! This runs for $30.00 for a 1.35oz bottle at Sephora. When it comes to primers, a little goes a long way, and the fact that this primer also moisturizes, it's a great investment. 

      Next, we got the ever popular Anastasia Beverly Hills Clear Brow Gel. 


      I love, love, love my Anastasia Beverly Hills Tinted Brow Gel in the shade Espresso. I use it every day to set my brows. But the shade Espresso makes my brows a little more intense just because they're darker. I wanted to give the clear brow gel a try for days when I'm feeling a bit of a more natural brow, but still want the brow hairs to be set in place. If you've never tried Anastasia Beverly Hills Brow Gel, and you're someone who does there brows... or even if you don't, you need this product! It perfectly sets your brows in place so the hairs don't fall or move throughout the day. This product runs for $22.00 at Sephora.


      A while ago, I made a post about the Sephora Favorites Perfume Sampler gift set that was available during the holidays. You can read that post by clicking HERE:  Sephora Perfume Sampler !!
      The gift set included a voucher for a free FULL SIZED bottle of any one of the perfumes in the sample set. After much deliberation, I finally chose to redeem my voucher and get... Marc Jacobs Daisy!! 
      This bottle is just the cutest thing ever!

      This perfume is such a perfect scent from the upcoming Spring and Summer months. It's very light and feminine, sophisticated, and playful. It has notes of Wild Strawberries, Violet Leaves, and Ruby Red Grapefruit. I am amused that there are no Daisy notes in the scent, haha. But it's amazing!! Like I said, it was free with my Sampler Set Voucher, but it runs for $74.00 for a 1.7 fl oz bottle at Sephora.

      Finally, I redeemed a sample of Philosophy's No Reason To Hide Imperfection Transforming Serum for 100 points. I didn't post an individual picture or go into details because it's just a small sample and I haven't tried it yet. But it's basically said to brighten, smooth, and even out your skin tone to give your a beautiful appearance and glow without actually wearing makeup. I'll get back to you all on how I like it and if I plan to purchase a full size!

      So there you have it! My new goodies. I hope I've inspired you to think about getting some of these. If you have them, let me know any tips and tricks you have! And let me know of any products you've been loving lately. I love getting suggestions. Until next time, sending you all love, and thank you for reading!

      Christina Bracco
      xoxoxoxo

      For PR inquiries, suggestions, comments, questions, please email: Christina.f.b@aol.com or fill out the Contact Form in the sidebar. 

      TWITTER <---- CLICK AND FOLLOW ME HERE!!

      INSTAGRAM  <---- CLICK AND FOLLOW ME HERE!!

      Friday, February 27, 2015

      Friday Favorite: Mally Beauty CityChick Smokey Eye Kit in Soho Silver !!

      Happy Friday, beauties!!

      It's been a very long week. I hope you are all doing something fun tonight! (I won't be, so let me live through you.)

      If you follow me on Instagram, and if you're not, you can follow me here: Instagram , you saw that I posted a gorgeous smokey eye look using my Mally Beauty Smokey Eye Kit in Soho Silver! I said that I would be writing a post about this kit, and here it is!


      This was the photo I posted!

      I just LOVE this look. I was in search for a perfect cool tone palette, and looked high and low for the perfect one. As I was going through all of my eyeshadow palettes, I noticed that every single palette that I own... WARM TONES. I loves me some warm tone shadows, but I'm trying to branch out.

      That's why I decided to whip out my Mally Beauty CityChick palette and give it a go! I'm SO glad I did. Look at this perfection: 


      I'm always very nervous with smokey eyes, especially cool tone/darker smokey eyes because I am as pale as casper, honey, and I don't want to overdo it! With this palette, it's impossible to mess up or give yourself that just-punched-in-the-eye look. The shadows are pigmented, but build-able. They start light and you just keep building until you're satisfied. Therefore, you don't dip your brush into the pan, place it on your eye, and you've got WAY too much shadow on. Noooooo thanks! This palette, however, is so safe, and I love that.


      Let's talk step-by-step about how to use this kit and get the look that I created in the above photo! I'll have more detailed/close up photos below. 


      The shade at the far left is your cream/powder base. Perfect as a primer/base to cover any redness, darkness, veins, etc, that you may have on your eye area. Put this all over your eye, from lid to brow bone.

      Next, apply the beautiful shimmery silver next to the base, from lid to brow bone. This color will give your eye a perfect glow when the light hits it, but it's not overly shimmery. This light shade also aides in keeping your look from getting too dark.

      Next, apply the matte medium shade all over your lid. Blend it into your crease so there are no harsh lines. This color is build-able, so you can pack on as much, or as little as you want.

      Finally, take the matte black at the far right of the palette and smudge it out on the outer corner of your lower lash line. That means, don't take the brush along the whole lower lash line (you can if you want, but for this look, I kept it in the outer corner.) I also tapped a little of this in the outer corner or the lid for more dimension. 

      And don't forget to blend, blend, BLEND it all out! 


      I'm not sure why that little line is there on my lid. It's not there in person. I think my lid wrinkles when I smile, haha!


      It's just a gorgeous Not-Over-The-Top (Unless you want it to be) smokey eye.

      You can wear this less dramatically during the day like I am, or you can smoke it up even more for the night by packing on more color and adding a black eyeliner for a more dramatic POP. 

      And there you have it! I really love this palette, and I hope I've inspired you to get it, or recreate a similar look with your own smokey palettes!

      If you have any cool tone palette suggestions, PLEASE comment below, email me, or fill out the contact form in the sidebar and share. I'm desperate!

      Have a gorgeous weekend! Sending you all love. Thank you SO much for reading,
      Christina Bracco
      xoxoxoxo

      For PR inquiries, questions, comments, suggestions, PLEASE email: Christina.f.b@aol.com or fill out the Contact Form in the sidebar. 

      INSTAGRAM  <---- CLICK AND FOLLOW ME HERE!!

      TWITTER <---- CLICK AND FOLLOW ME HERE!! 

      Tuesday, February 24, 2015

      Skincare Secret: Organic Coconut Oil !!

      Hello, beauties!! Welcome back!

      If you don't like coconuts, just get out now. NO, I'M JUST KIDDING! COME BACK, I LOVE YOU!

      But for reals. Coconuts are amazing. I'm a sucker for any coconut infused/scented/flavored ANYTHING. They taste amazing, they smell amazing, and they're amazing good for your skin...? SAY WHAT?!

      It's true! Today's post is all about one of my holy grail skincare secret products, Organic Coconut Oil!


      Now, I know that Coconut Oil is suddenly becoming a trend in the beauty/skincare world, but it's very important when I say that my holy grail secret is Organic Coconut Oil. We don't want to put just any cheap/supermarket Coconut Oil on our face. Many regular coconut oils are broken down, or filled with extra chemicals and ingredients that tamper with the natural benefits of Coconut Oil. That's why it's important to purchase Organic Coconut Oil. Sure, it's a teeny bit more expensive, but it's much safer for your skin, and much more beneficial, and that is what is most important. Also a jar of this lasts FOREVER, so it's not a pricy investment.

      So, let me tell you about the types of benefits and ingredients Organic Coconut Oil has before I tell you all of the ways you can use it!

      Organic Coconut Oils is jam PACKED with Saturated Fats, more specifically, Triglycerides. The presence of these fats is what keeps the Organic Coconut Oil full of moisture and hydration while applied onto the skin because the fats keep the moisture from escaping into the pores. When the Organic Coconut Oil is ingested, these fats settle under the skin, giving you a healthy, smooth, even- toned glow, while also minimizing the appearance of pores. Pretty awesome so far, right?

      Organic Coconut Oil also contains Vitamin E. Sooo beneficial! Vitamin E is essential in providing the skin with a healthy glow, while helping to repair damaged, cracked, torn, irritated skin. Vitamin E also fights against the development of fine lines and wrinkles due to its antioxidant properties.

      Organic Coconut Oil also contains Protein. Protein helps to maintain healthy skin both internally and externally. Protein helps with cellular damage and tissue repair, while also preventing scarring.

      Organic Coconut Oil also contains something called Capric/Lauric Acids. These acids help to prevent microbial infections that can strike open wounds and pores, due to their disinfectant/antimicrobial properties. Capric and Lauric Acids also release energy-boosting properties that may give you more energy throughout the day.

      Who wouldn't want to bathe in this stuff after hearing all that?! Get me to the tub!

      There are countless amounts of ways to use Organic Coconut Oil, so there's no way I can list them all. But I will give you 10 Different Ways to use Organic Coconut Oil that I use myself!

      *It's important to note, just incase you're confused when you get it... Coconut Oil is solid in the jar. However, when it comes into contact with heat (either in a pan) or the body heat from your fingers, it will turn into an oil. Just rub your fingers in the jar and apply directly to wherever you wish to apply!

      Right before I do that, let me remind you from my Argan Oil post a few months ago... if you have oily skin, it is BENEFICIAL to put oil on your face. Do not be afraid of oils. When you apply oil to your face, your body feels less necessity to continue to produce its own oils, thus, balancing you out. Putting Organic Coconut Oil on your face is safe for ALL skin types.


      • As an all-over moisturizer for face and body
      • Specifically under your eyes to work as an eye cream. Preventing dark circles and fine lines and wrinkles. (My favorite way to use it.)
      • In your hair to smooth fly-aways and frizz
      • To smooth and hydrate damaged,dry hair, and prevent split ends
      • As a hand cream
      • Moisturize cuticals
      • As a lip moistrizer
      • Add it into DIY (Do It Yourself) creams/masks/scrubs
      • To shave your legs
      • To remove eye makeup
      There you have it! Those are just 10 simple ways to use Organic Coconut Oil. There are way more ways than that, but I don't have all day, girlfraaaand!

      So incorporate Organic Coconut Oil into your skincare regime, and absorb all of the benefits this natural plant oil has to offer!

      If you already use Organic Coconut Oil, what are some of your favorite ways to use it? Let me know!

      Have a great rest of the week, and I will have a new post for you up on Friday!! 
      Christina Bracco
      xoxoxoxo

      For PR inquires, comments, questions, suggestions, PLEASE email: Christina.f.b@aol.com or fill out the Contact Form in the sidebar.


      INSTAGRAM  <--- CLICK AND FOLLOW ME HERE!!

      TWITTER <--- CLICK AND FOLLOW ME HERE!!

      Monday, February 23, 2015

      REVIEW: Benefit Cosmetics Rockitude Rockin' Rose Gold Lip and Cheek Kit!!

      Happy Monday, beauties!!! 

      I hope you all had a great weekend! I've been so excited to get back to blogging regularly. I'm feeling much better after a few days of resting, and I'm finally able to (kind of) smile again. 

      The product of today's post is definitely smile worthy! I purchased this on a whim about a little over a week ago, and I was so excited to write a post about it! 

      What is it?

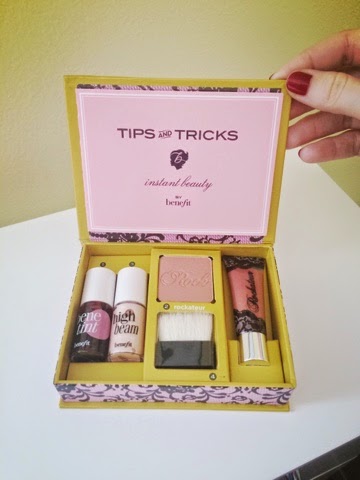
      Benefit Cosmetics Rockitude Rockin' Rose Gold Lip and Cheek Kit!! 


      I was strolling through Sephora, looking for nothing in particular, when I stumbled upon this super cute Benefit kit! 

      I LOVE the whole idea of this kit! I think it's such a cute product that gives makeup lovers the ability to give a number of their Benefit Cosmetic products a try for a great price!! 

      I really love Benefit Cosmetics for their great kits and sets that they have. I'm a sucker for a good kit for a good price, and Benefit never fails me when I'm in the mood to try numerous products. Keep it up with the kits, Benefit, and I'll purchase your products forever!

      They have a few of these Lip and Cheek kits. It was hard for me to choose which I was going to buy. 
      There is:
      • Rockitude Lip and Cheek Kit
      • Sugarlicious Lip and Cheek Kit
      • Feelin' Dandy Lip and Cheek Kit

      With that being said, I will certainly be purchasing the others at a later date! 

      I decided to go with the Rockitude Lip and Cheek Kit. 


      Within this kit, there is:

      • 0.13oz Benetint Rose Tinted Lip and Cheek Stain
      • 0.13oz High Beam Luminescent Complexion Enhancement 
      • 0.22oz Rockateur Ultra Plush Gloss
      • 0.1oz Rockateur Famously Provocative Cheek Powder
      • Cheek Powder Applicator
      • Tips & Tricks
      The price of the kit is $28.00! I feel that is such a great price for all of this product. 

      The packaging is adorable, as always. I think Benefit wins in the packaging department. Always on point. 

      I've been wanting to try so many of Benefit's products that are in this kit. I've heard so many great things about them!

      The Benetint is a Benefit Bestseller that leaves your lips and cheeks with a beautiful pop of color. Basically a liquid blush! While the High Beam is another Benefit Bestseller, and one of the most popular highlighters for the contour game in the beauty world. If you want a beautiful luminescent shine on your cheek bones, or anywhere else you'd like to highlight for that matter, BUY THIS! It's amazing. And of course, you can never go wrong with a beautiful mauve-y blush or gloss. A little really goes a long way with each of these products.

      There is also a really great little booklet attached to this kit with great tips and tricks on how to use each of the products! 

      The whole kit is amazing. I'm so happy I spotted it while strolling through Sephora. If you're looking to try Benefit Cosmetics products, or you're just looking for a fun new makeup toy to play with, I really suggest all of the Benefit Lip and Cheek Kits. I will definitely be purchasing the others! You really can't beat the price. 

      I hope I've sparked your interest with this post. Let me know if you're going to give this kit a try, or if you've tried the other kits. Also, feel free to suggest more Benefit Cosmetics products to me! I'm always looking for suggestions.

      I'll be back in a few days with a post on a skincare trick! Until then, stay beautiful!

      Christina Bracco
      xoxoxoxo

      For PR inquiries, questions, comments, suggestions, please email: Christina.f.b@aol.com or fill out the Contact Form in the sidebar. 

      TWITTER <--- CLICK AND FOLLOW ME HERE!!

      INSTAGRAM  <--- CLICK AND FOLLOW ME HERE