Find Me On Social Media

Showing posts with label Beauty Blogger. Show all posts

Monday, May 1, 2017

Jeffree Star Cosmetics x Manny MUA Collaboration Review

Happy Monday, Beauties!

I know I had mentioned in my last post that I would be coming to you with a makeup haul, but I decided to switch things up! I purchased some products from the Jeffree Star Cosmetics x Manny MUA collaboration, received them last week, and I felt they deserved their own post!

For those who do not know, let me break it down!

Manny MUA on the left. Jeffree Star on the right.
 Jeffree Star and Manny MUA are two major influencers in the beauty community, predominantly, on YouTube & Social Media. They're also besties!

Jeffree & Manny teamed up to launch an incredible collab of two liquid lipsticks, and a highlighter.

When the collab first launched, they offered a sweet deal on a bundle, in which you get all 3 products in the collab for an amazing price. The bundles quickly sold out, despite the large number of units they ordered for the launch... no surprise here. SLAY.

I still really wanted to try the products & show support, especially since I'm a huge fan of both of these guys, and have never owned any Jeffree Star Cosmetics products before! And so I placed my order.

Let's first start with the packaging.


I am kind of obsessed. How sick is this packaging? It only got better as I kept unboxing...


The packaging alone had me shook. I would expect no less from JSC, as he would only produce the best of the best, but I was genuinely so excited and blown away!

Let's talk about the three products available, and then I'll dive into the two that I purchased!


As mentioned earlier, the collaboration includes two beautiful liquid lipsticks in Jeffree's classic velour formula, and a beautiful Skin Frost (JSC name for highlighters).

Daddy on the left. I'm Shook on the right.

Eclipse Skin Frost

There are two stunning Velour Liquid Lipsticks available in the names I'm Shook and Daddy.

Daddy is a gorgeous mauve/brown nude. I don't really wear these types of shades, so I skipped out. However, if I were quick enough to have gotten the bundle, I would have totally been excited to try it! Daddy is currently sold out, but you can always check https://jeffreestarcosmetics.com or Jeffree's Twitter for announcements of restocks.

What I purchased:


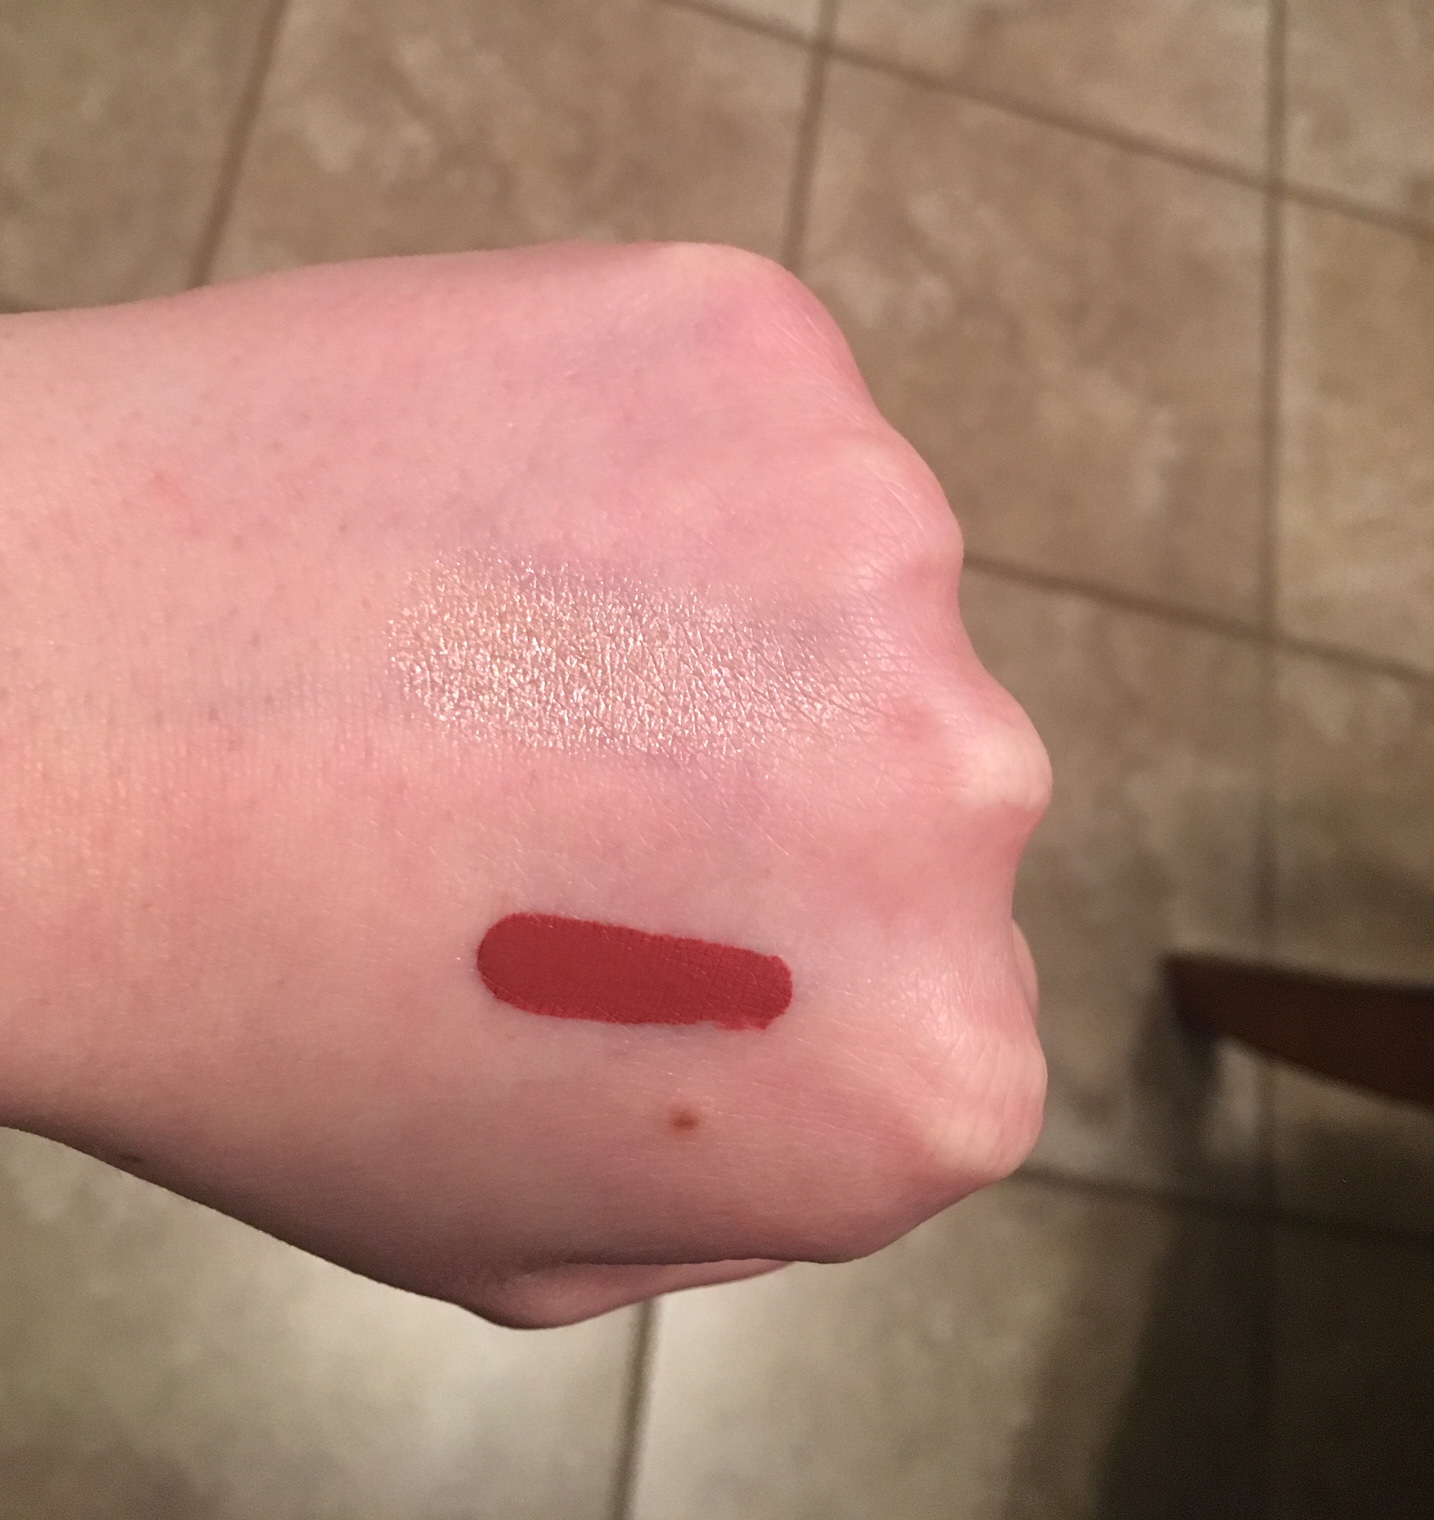
I'm Shook is the liquid lipstick I purchased. This is such a unique shade, it's hard to describe it! It comes off more red in the photos, but in person, I'd describe it as watermelon.


The Skin Frost shade, Eclipse, is a gorgeous rosy/golden sunlight. The pigmentation is incredible! One application and you're glowing to the heavens! I, however, like to layer as much highlight as possible because you can never have enough of a glow.


How Much?

All of Jeffree's liquid lips go for $18. That is an epic price. In my opinion, this liquid lip is 10x better than several high-end brands I've tried, and for way less money.

The skin frost goes for $29. Another STEAL in my opinion! The compact, you guys. It's huge. How does Jeffree make money? You will never run out of these skin frosts! It's 2x's your average compact size!


Not only are the prices incredible, but the quality is as well. I am beyond blown away and pleased with my purchases. I cannot wait to try more of Jeffree's products. He and Manny totally blew it out of the water with this collection.


Be sure to use the code MANNYMUA at checkout to save 10% on any of the collab products you may wish to purchase! This code is only good for the three collab products. So, even if you'd like to purchase all three products before they restock the bundles, you can still save some dollars!

Not only are the prices incredible, but the quality as well. I am beyong blown away and pleased with my purchases. I cannot wait to try more of Jeffree's products. He and Manny totally blew it out of the water with this collection.

Let me know what other Jeffree Star Cosmetics products I should try! After being so happy with my two purchases, I can't wait to try more!

I promise I will post my haul next week! I've purchased a lot of great products from Ulta & Sephora lately that I'm super excited about, so I can't wait to share! 

Until then, stay beautiful,
Christina Bracco 
Xoxoxoxo

For PR Inquries, questions, comments, suggestions, please email ChristinafBracco@gmail.com or please fill out a Contact Form in the side bar. Thank you. 

Let's Connect on Social Media!!!!

Instagram <-------- CLICK AND FOLLOW ME HERE!
Twitter: <-------- CLICK AND FOLLOW ME HERE!
SNAPCHAT: christina_fb (ChrissyBracco)
SaveSaveSaveSave

Sunday, April 23, 2017

Anastasia Beverly Hills x Nicole Guerriero Glow Kit Review!

Happy Sunday, Beauties!

I hope everyone had a beautiful week! The weather has been up and down here in NYC, and I'm anxiously awaiting Spring’s arrival. Well, Spring has arrived, but it kind of keeps deciding to leave again.

This week, I was lucky enough to receive the Nicole Guerriero x Anastasia Beverly Hills Glow Kit. When I opened it, I just knew I had to share it with you all & give my thoughts! 


Anyone who knows me, knows I like to highlight like I'm trying to signal an aircraft in space. HIGHLIGHT TO THE GODS. 

Check out my Strobing How-To by clicking  HERE

I own way too many highlights -  Palettes, eye shadows that I use as highlights, kits... too much. So why not add another one to the mix? I see nothing wrong with this. 

This Glow Kit is nothing short of what you'd expect from such a popular, high end brand such as ABH. They've delivered many a Glow Kit over the years, and yet, they never seem to disappoint. In fact, it seems they only get better.

Let's first start off with the basics you need to know about this kit...

ABH partnered up to do a collab with fellow highlight queen, Youtuber, Nicole Guerriero. Nicole has a beauty channel on YouTube, and she's someone I've been a fan of for years. She's an OG with killer content. I highly suggest you check out her Halloween tutorials. 

Check out Nicole's YouTube page HERE: https://www.youtube.com/user/nguerriero19

This kit is limited edition. It made its debut last month, so I'm sure it won't be available much longer. If you want it, make sure you get it! Before I received it, I tried finding it in stores, but it was sold out! 'Tis a hot commodity.

ABH x Nicole Guerriero killed it with this palette. From the names, to the shades, to the formulas. Perfection. 

Let's jump into the Glow Kit, shall we?! 


Isn't she beautiful?!


The packaging is STUNNING. The kit has the same packaging of all the others from ABH, inclusive of a sleeve and plastic film protecting the pans inside. The beautiful blush color with beautiful specks of diamond dust, and the holographic effect to the text... I leave breathe, eat, sleep, cry this palette.  

The shades are gorgeous. I have some swatches/descriptions down below for more details, plus, a snap of me wearing some of the shades!


How cute are the names by the way? Very Nicole-Esque.

The formula is the same as previous ABH Glow Kits. Really creamy/smooth consistency with no fallout & great pigmentation! 

Kitty Kat - Pink champagne
Forever Young - Rose Gold
DayDream - Peachy Pink 
Forever Lit - Icy White
Glow Getter - Champagne
143 - Gold 

From top to bottom: Kitty Kat, Forever Young, DayDream
Left: 143 
From top to bottom: Forever Lit, Glow Getter
Every shade is incredibly unique, and simply stunning. I love switching up the shades daily, and sometimes mix some of the shades together, or with other highlights outside of this kit. 


I snapped this shot when I was in the car running errands yesterday (at a red light, of course). I had nothing but foundation, contour, blush, and highlight going, but I thought I'd share the photo anyway to display the POPPIN' that is this highlight. In this shot, I have a mix of Forever Young with a quick splash of Forever Lit on top.

Important to note: All of the shades in this kit would definitely look gorgeous on any and all skin types!

You can really do a lot with this kit. The shades are really fun & something different, yet practical! You can Glow to outer space, or keep a simple glow-from-within look. 

Be sure to look for it in your local Sephora, or at AnastasiaBeverleyHills.com 

I took full advantage of Sephora VIB sale event this week, so I'll probably be bringing you a haul post next week! Did anyone else sale it up? I lost my VIB Rouge status, and got downgraded to VIB because I'm too responsible with money, so I had to settle for the 15% off, rather than 25%. First world problems.

Until Then, Stay Beautiful,
Christina Bracco

Xoxoxoxo

For PR Inquries, questions, comments, suggestions, please email ChristinafBracco@gmail.com or please fill out a Contact Form in the side bar. Thank you. 

Let's Connect on Social Media!!!!

Instagram <-------- CLICK AND FOLLOW ME HERE!
Twitter: <-------- CLICK AND FOLLOW ME HERE!
SNAPCHAT: christina_fb (ChrissyBracco)


Monday, April 17, 2017

What's in My April Ipsy Glam Bag!

Happy Monday, Beauties!

I hope everyone had an incredible weekend celebrating the holiday's with their loved ones. This has been one incredibly long week, so I was happy to just relax, and spend time with family coloring Easter eggs, and eating a lot of food! 😉

Today, I'm very excited to kick off a fun new series of Ipsy unboxing's on my blog!

For those who don't know, Ipsy is an incredible beauty program, founded by beauty influencer Michelle Phan, where you subscribe to receive shipments of 5 beauty products monthly!

When you sign up, you take a quick quiz about your beauty style & products you love, and you pay just $10 a month to receive 5 different products (a mix of full size a & deluxe samples), varying from haircare, skincare, cosmetics, beauty tools, nail care, and more!

What's most fun, is that every glam bag you receive has a different theme. So, not only are you getting 5 amazing products sent to your door every month, you get a super cute makeup bag along with it!

For the month of April, Ipsy partnered with beauty influencers Gabriel Zamora and Bailey Sarian to create the SideShow Glam Bag.

How cute is this theme? The bags are really great quality!
You have the ability to get a peak at what you're receiving in your bag each month, but I like to keep it a surprise! It's so much fun to come home from work and see the pink package sitting in my mailbox, and then getting to open up the package to see what this months bag looks like, and checking out all of the new/cool products I get to play with! This is especially good after I've had a really rough day at work...

Let's jump right in and have a peak inside to see what I recieved in this months Glam Bag.


I'm really excited about all of the products I received this month! It was a good bunch. A great mix of makeup, skincare, and nails!

First off, we received this gorgeous Glamour Dolls x Lisa Frank Blush Brush!

This brush was an Ipsy Pre-Launch! Remember the brand Lisa Frank from when you were in like, middle school? Just me? I'm old. This was the IT brand back in the day. Hello, throwback. Now, it's teaming up with Glamour Dolls to create a super cute collab!

This brush is really high quality. Vegan-frienddly, synthetic bristles. The bristles are so soft. I can't wait to play with it and see how it blends on the skin! And... it's like, pink... with unicorns on it... what more could you need?!


 Next up, we received a Colour Pop Creme Gel Liner in the shade "Mr. Bing"!

I was a littleeeee disappointed in this goodie, because when I received it, the side of the packaging is a really beautiful turquoise color. This led me to believe that this is the color of the liner, as most companies put the shade of the product on the sides of their packaging. However, when I opened up the box, it was a brown liner. Still gorgeous, but I got excited that I could play with this beautiful "blue" liner.


This is my first Colour Pop product, so I did some research, and it looks like all of their gel liners have the same color on the side of the packaging.

Regardless, it's a beautiful liner. When I swatched it (you can see below), it applied incredibly smooth. I look forward to using it !

Next up, we have the Naked Cosmetics eyeshadow in the shade Heavy Medal #4

This is a loose pigment shadow, with a beautiful metallic finish.


I've only swatched this shadow, but it seems like it may have some fallout. However, I love how pigmented it is! I'll see what happens when I work with it on the lid, and give you all an update!

Top - Naked Cosmetics Heavy Metal
Bottom - Colour Pop Creame Gel Liner
I also received a really cool deluxe sample of a vitamin C serum from MintPear.

I've never heard of this brand, but received their C Your Youth Vitamin C Serum, and based on what I'm reading, I'm really excited to try this! This serum is used to battle signs of aging such as dullness, wrinkles, sunspots, and fine lines.


25% of this serum is straight up Vitamin C. That's amazing! Some other magical ingredients include thyme extract, camomile extract, Vitamin E, & Aloe.

If this product is as amazing as it sounds, I will definitely be purchasing a full size!

Last, but certainly not least... the goodie I'm probably must excited about!


This is a gorgeous nail polish duo from Meg Cosmetics! The set is called "Lovey Dovey"

Anyone who knows me knows I LOVE switching up my nail color. I've been doing my own nails for years, and I have accumulated many polishes over the years. 

These colors are gorgeous! There's a beautiful cool-toned bluish gray shade, along with an equally as beautiful cool-toned dusty nude shade!


How cute is this?! I'm obsessed! Pop off the top black lid, and you have two separate shades.

These shades are really on trend with what's all over the runways right now. I cannot wait to use them!!!!!

And there you have it! This month had some amazing trinkets! I can't wait to play with them!!

Share what you got in your Ipsy bag!

Until Then, Stay Beautiful,
Christina Bracco
Xoxoxoxo

For PR Inquries, questions, comments, suggestions, please email ChristinafBracco@gmail.com or please fill out a Contact Form in the side bar. Thank you. 

Let's Connect on Social Media!!!!

Instagram <-------- CLICK AND FOLLOW ME HERE!
Twitter: <-------- CLICK AND FOLLOW ME HERE!


SNAPCHAT: christina_fb (ChrissyBracco)

SaveSave

Sunday, April 2, 2017

I'M BACK!!! Favorite Foundation: NEW - Mally Beauty Flawless Finish...

Hello, my loves!!!!

Long time no talk, huh?

After a year+ long hiatus, I am coming back to you all with new posts about my favorite, beauty, fashion, and lifestyle products, tips, and tricks!

 I'll be starting off with one post a week, and as things ramp up, I will be back with two posts a week!

I wanted to kick off this return by bringing you all one of my instant ride or die foundations, that is absolutely perfect for Spring and Summer (and really all seasons, but I digress).

In true Beauty by Bracco fashion, this foundation is by none other than Mally Beauty!

The new Flawless Finish Transforming Effect Foundation.


In this post I will provide info on the consistency of the foundation, shades, price, application... everything you need to know! Let's jump right in! 💄

This foundation originally made its debut a few months back in a Today's Special Value set on QVC. I happily purchased the kit (what a surprise, what a surprise), and when I tried this foundation on, I instantly fell in LOVE.

I was anxiously awaiting this foundation to be sold on its own... because I need it in my life at all times, and as of a few weeks ago, it's finally here!

Mally Beauty was spot on to include "Flawless Finish" within the name, because that is exactly what it gives you! This is a full coverage foundation, but it's so light on the skin, it feels like you're wearing nothing at all.

The foundation has a really unique consistency. It kind of reminds me of cheesecake when you swirl the brush on the mesh screen to pick up the product. It's a bit frothy, and has a bounce to it, however, when you begin applying the product, it melts into the skin like a liquid foundation. I recommend applying the foundation, regardless of which type of brush you use, in a circular motion on the face - This gives the most blend-able application, and most flawless finish. The Flawless Finish foundation is build-able, so I would say less is more. A little goes a long way with this product!

This foundation, like most liquid/cream foundations, applies best with a tight-dense brush. I, of course, recommend using the matching brush for application. I talk more about how you can get that towards the end of this post!

Not only does it feel like you're wearing nothing at all, but it looks like you're wearing nothing at all. It's so thin, and so light-weight, it just makes your skin have the illusion of a natural glow.

Wearing the Mally Beauty Flawless Finish Transforming Effect Foundation. Check out that glow!! (Also brought to you by Anastasia Beverly Hills Glow Kit 😉 ) 


Due to the lightweight technology, this foundation is perfect for Spring and Summer. I know for myself, the more time I spend in the sun, the lighter I want the products to feel on my skin! I like my skin to breathe!


Once I apply this foundation, and set it, it doesn't move at ALL. I am an oily-skinned sister, so it's difficult for me to find liquid-esque foundations that apply smoothly, and don't break up on the skin, or let the oil seep through after a few hours of wear.

This foundation applies in about 30 seconds, and it doesn't come off until you decide to take it off.

Shades:

Fair: Nicole Kidman's of the world/if you burn easily in the sun
Light: If you have a little more warmth to your skin (my shade)
Medium: In between light & tan
Tan: The Mally's of the world
Rich: The deepest of the deep

I highly recommend you all try this foundation! Whether you're getting ready to go to work in the morning, going to the zoo in the summer where you're going to sweat like a sinner in church, or you're a busy mom with only a few minutes to yourself - this foundation is made↠ for everyone. It's so easy, so lightweight, so flawless on the skin. Please try ittttttttttttt??????

It's currently being sold on QVC for a featured price of $36 (original $40). I suggest purchasing via QVC, as always, because you get the incredible matching brush for free with your purchase. The brush is killer, beauties!
You can find the product on QVC by clicking HERE: http://www.qvc.com/Mally-Flawless-Finish-Transforming-Foundation-w-Brush.product.A285168.html 

Let me know if you'll be giving this foundation a try! I'd love to hear your opinions of the foundation as well!

I'm so incredibly happy to be back to blogging, and I hope you all enjoy reading as much as I enjoy putting these posts together!

See you next week!

Until then, Stay beautiful,
Christina Bracco
xoxoxoxo

For PR Inquries, questions, comments, suggestions, please email ChristinafBracco@gmail.com or please fill out a Contact Form in the side bar. Thank you. 

Let's Connect on Social Media!!!!

Instagram <-------- CLICK AND FOLLOW ME HERE!
Twitter: <-------- CLICK AND FOLLOW ME HERE!
SNAPCHAT: christina_fb (ChrissyBracco)


Tuesday, October 13, 2015

Too Faced Le Grand Parais Holiday Collection Review!!

*Come play with me on Snapchat! Follow: Christina_fb*

Welcome back, beauties!!

I'm sorry it's been so long since I've last posted. I have been super busy, and super stressed. However, I was determined to get this post out for you guys and dolls because I had to share this amazing product that I am currently obsessed with.

Not only is Fall my favorite season, but it also means that another favorite season of mine is upon us...
Yes, my friends, it is holiday palette season!!!!! *Screams and dances around the room*

I am SO excited to see what my favorite brands have in store for the holiday season! We're slowly being introduced to the amazing value sets, palettes, and special editions, and I cannot wait to see what else is released in the upcoming weeks!

Due to being a VIB Rouge member at Sephora, I was able to get early access to a special holiday palette about a month ago. I held off on posting about it until I knew it was released to the public (which it now is) so I HAD to share how beautiful this palette is.

Introducing...

The Too Faced Le Grand Palais!


ARE YOU FREAKING OUT? BECAUSE I AM FREAKING OUT.

This set is stunning. The presentation of this set from Too Faced is nothing short of spectacular. 

Look. At. It.

This is one of three holiday collections from Too Faced's Christmas in Paris Collection. Currently, this is the only one I own, therefore, it is the only one I will talk about!

If you are interested in the others, there is a smaller collection exclusive to Ulta Beauty, and a medium collection available through Sephora, Ulta, and Too Faced.

Too Faced Le Grand Parais is exclusive to Sephora, and the most expensive of the three, but this also offers you the most bang for your buck!

Le Grand Parais is a $58.00 holiday set valued at $378.00. That is amazing!

Let's dive right in, shall we?


This is what the outer packaging looks like. The quality is top notch. Very sleek, very classic. Beautiful to give as a gift. You don't even have to wrap this. 

The attention to detail that was put into this packaging is epic. This is no ordinary cardboard box. Here's a close-up shot of the details:


Do we see the raised etching? ARE WE SEEING THE BEAUTY? And the ribbon is real ribbon. Ugh. Slaying me sideways.

When you remove the set from the outer box, you see this:


More perfection. 

Take off the lid of this adorbs gift box, unfold it, and be amazed...


How. Beautiful. Is. This. The detail is incredible. THE SCENERY. FOR A HOLIDAY SET. SLAY.


Here is a closeup shot of the freebies. A deluxe-size Better Than Sex Mascara, a deluxe-size Liquid Lipstick in Melted Peony, and a Shadow Insurance Eye Primer.

How cute is this? Seriously. Look at the shopping bags. I spy a Chocolate Bar palette, some Too Faced blush, and some Liquid Lipsticks. And the wrought iron staircase? The mannequin with her fancy dress and pearls? Where you goin', gurl?!

When you lift up the bottom half, you dive into the palette...


Featuring 18 eyeshadows varying between mattes, shimmers, and sheers, with adorable holiday-themed names, two blushes, a bronzer, and a highlighter... this palette gives you everything you need.


How gorgeous are these shades? 

Now, I will say... the pigmentation... not the best of Too Faced's work. 

The highlighter, Flush, is stunning. The matte shadows are very pigmented. The blushes are on the sheer side, but I think they're buildable if you play around.

The colors such as Eiffel, Midnight in Paris, Wish List, and Party Dress... a bit disappointing in the pigmentation category. They're beautiful shades, and they're buildable, but I wish you didn't have to work that hard to get good pigmentation. 

Like all Too Faced palettes, Le Grand Parais comes with a Glamour Guide to help you create beautiful looks with all of these shades. 

If you'd like, I can do a tutorial using one of the looks in the Glamour Guide! 

All in all, this palette is a fantastic gift for any makeup lover, or anyone looking for a great palette that covers lips, primer,shadow, mascara, contour, and highlight! This palette has got you covered! 

And it's an adorable piece that can be displayed on any vanity, dresser, desk, etc. 

I praise this palette. Definitely very impressive. I'm curious as to how Too Faced will top it next holiday season! Do you plan on picking this up? Gifting it or keeping it for yourself? 

Have you tried the other Too Faced Christmas in Paris sets? How are they? 

I'm going to have a fun Fall tutorial up next! Stay on the lookout for that!

Until then, stay beautiful 
Christina Bracco
xoxoxoxo

INSTAGRAM  <----- CLICK AND FOLLOW ME HERE!!

TWITTER <----- CLICK AND FOLLOW ME HERE!!

Friday, October 2, 2015

Order to Apply Makeup- Feat. Product Suggestions!

Happy Friday, beauties!!

I hope you're all having a spectacular week! Happy October :)

Today's post is all about the right way to apply makeup! 

Did you know that there is an order in which you're supposed to apply your makeup products? Mhmm, that's right! 

There is a specific order to ensure that you are getting proper use, coverage, and pigmentation out of your products! I'm sharing with you all, that order, and some product recommendations along the way. Let's jump in, shall we?!

First, of course, apply whatever moisturizer you use. Depending on the consistency of your specific moisturizer, give it some time to soak into your skin before starting your makeup application. I use Argan Oil as a moisturizer, so I wait about 5 minutes after I apply it, to sit down and start applying my makeup! 

Now, if we're in a rush, or we're not doing a full face, we may jump around in the order in which we apply, but especially if you're doing a full face, try to stick to this order!
_________________________________________________________________________________

Some people like to apply the beginnings of their face makeup (i.e. foundation/concealer) before working on their eyes. However, this is not the best move, and I do not recommend doing that.

When we apply eyeshadow, there is always fallout. If you're patting a shadow on your lid, some of the shadow is falling onto your under eyes/cheeks. Even just moving the shadow brush towards your eye, fallout is happening, ladies! So, if you have your foundation, and even your concealer, applied, you're getting little pink, gold, black, whatever color shadow your applying, dustings on your face! Then, you're going to have to touch up the mess.That's why, it's best to first work on your eyes, and then move on to your face.

  • Start off priming your eyes. I've shared that I like to prime my eyes with a concealer and powder, but if you'd prefer a shadow primer on the market, go for it! However you chose to prime, just make sure that you prime! It seriously gives your shadow long wear, crease free.
          Eye Primer suggestions: Too Faced Shadow Insurance/ Urban Decay Primer Potion.

  • Next, apply your shadows as you normally would. I always apply my shadows by applying a base color. Usually a light shadow just to give a little extra evening out and brightening of the eye area. Then, I go in with my lid shadow, patting it gently all over the lid. Next, in windshield wiper motions, I apply my transition shade in the crease, and then finally, I apply my darker shadow to my outer corner. Easy enough! 
          I won't give any shadow suggestions, because that's just impossible. There are way too        
         many shadows out there, haha. But if you'd like a universal palette recommendation, the    
         Too Faced Chocolate Bar is a go-to!

  • Once you're done applying your shadow, then it's on to curl your lashes! 
          Eyelash Curler suggestion: Sephora Collection Eyelash Curler.

  • Next, it's time to apply your mascara. Note: After curling my lashes, I only apply one coat of mascara to my top lashes. Do not apply your second coat to your top (if you're one who applies a second coat) and do not apply to your bottom lashes yet. We will get to that in a while, and I will explain why we're not finishing that step yet.
         Mascara suggestions: Please see my post on my Top 5 Favorite Mascaras for suggestions!   


Now it's time to move on to the face!

  • Prime your face! I'm a firm believer in priming your face before applying foundation/concealer/bronzer/etc. - It truly helps to keep your makeup in place, lasting long, and bulletproof. The only time I do not prime my face is if I'm wearing a tinted gel or tined moisturizer. Otherwise, prime, prime, PRIME!
          Face Primer suggestions: Mally Beauty Perfect Prep Poreless Primer/ Tarte BB Tinted  
         Treatment 12-Hour Primer/ Benefit Porefessional.

  • Foundation time! If you are using a liquid foundation, apply one pump to the back of your hand, then take your CLEAN ring finger, and dot the foundation all over your face. Then take your brush and buff it into your skin, or take your damp BeautyBlender and pat it out gently! If you're using a powder foundation, simply swirl your brush into the product, tap out the excess, and then swirl the brush onto your skin, buffing out the product evenly! 
          Foundation suggestions: Make Up Forever HD Foundation/ bareMinerals Original   
          Foundation/ Mally Beauty Poreless Perfection Foundation. 

  • Concealer! Now is the time to apply concealer under your eyes, and to any blemishes that you'd like to give a little extra coverage! I apply my under eye concealer in a triangle shape, and then I take a damp BeautyBlender and pay it out very gently. The same technique goes for blending out concealer on a blemishes, pat it out with a BeautyBlender. Tapping out provides better coverage and keeps the concealer in place. Wiping just removes the product. Don't forget to set your concealer with a powder if you do that step! I do not. With the concealers I named below, there is no need for me to set them. They don't move :)
          Concealer suggestions: Urban Decay Naked Skin Weightless Complete Coverage 
          Concealer/ It Cosmetics Bye Bye Under Eye.

  • Now it's time for bronzer! Now is the time to warm up your face by swirling bronzer on the sides of your forehead and your cheeks. If you're contouring, chisel out those cheekbones and your temples! 
         Bronzer suggestions: Mally Beauty Believable Bronzer/ Benefit Hoola Bronzer.

  • Time to highlight! After you've put a shadow effect on the parts of you're face you're trying to pull backwards with your bronzer, it's time to brighten and apply light to the parts of your face you'd like to pull forward. Apply highlighter to the tops of your cheekbones, your cupids bow, down the bridge of your nose, the center of your chin, and the center of your forehead. If you'd like a more detailed explanation on how to highlight, HERE is a complete post dedicated to just that! 
         Highlighter suggestion: Josie Maran Argan Elightenment Illuminizing Wand.

  • Blush! It's time to give those cheeks a glowing color! Tap your brush into your blush, tap out the excess, and then smile and swirl your blush onto the apples of your cheeks, working backwards.
         Blush suggestions: Benefit Rockateur Blush/ Tarte Amazonian Clay 12-Hour Blush.

Remember when we paused on our eyes? We're back to finish them up!

  • Now it's time to apply your second coat of mascara to your top lashes. This helps to lift your lashes an blacken them up after all that powder from our foundation, blush, bronzer was applied and dusting around! Also, apply one coat of mascara to your bottom lashes. We didn't do this step earlier, because if we had, we would have just went on to apply our foundation and our concealer. When blending and tapping those products out, we would have hit our lashes and gotten product on them giving your lashes a lighter effect. Now, they're safe, long, and black! 

  • Eyebrows! Highlight your brow bone with your favorite eyeshadow or highlighter! Similar to the mascara scenario, we wait to do our eyebrows so that we do not get product all over our fresh brows. Foundation, concealer, brow highlight, bronzer, all get stuck in our brows while we're applying, either by fallout or by swiping over them with a brush. This moves our brow hairs around, and lightens them. By applying our brow product now, we are getting the most out of our application. Brush out your brows with a spooly, apply your favorite brow product, and then git them with a brow gel to keep them bulletproof all day! 
         Brow Product suggestions: It Cosmetics Universal Brow Power (here is a post all about 
         this holy grail product of mine: BROWS / Brow Gel: Anastasia Beverly Hills Clear Brow 
         Gel. 

  • Finally, apply your fav lip color, whether it's a lipstick or a gloss, and hit your face with some setting spray! 
         Setting Spray suggestion: NYX Dewey Finish Setting Spray. 

There you have it, ladies! Now, your makeup is bulletproof, pigmented, and ready to take on the day with perfection! 

Go off and enjoy your makeup!

I'll be back next week with some fun, Fall, vampy, makeup tutorials, and other goodies! 

Until then, stay beautiful,
Christina Bracco
xoxoxoxo

For PR inquiries, questions, comments, suggestions, please email Christina.f.b@aol.com or please fill out a Contact Form in the sidebar. Thank you.

INSTAGRAM <----- CLICK AND FOLLOW ME HERE!!

TWITTER <---- CLICK AND FOLLOW ME HERE!!


Wednesday, September 9, 2015

Top 5 Must-Have Mascaras!

Hello again, beauties!!

I hope everyone had a happy and safe Labor Day weekend! Now that summer is coming to a close, and autumn is upon us, I will be back weekly on my blog! Though I am so incredibly sad to see summer go, I am ready for all the great things autumn brings along. I have some great favorites, routines, and tutorials planned for fall, and all fall beauty trends! Yay!

Today, I wanted to share with you all my top 5 must-have mascaras! 

I own quite a number of mascaras. I'm not even entirely sure how I've accumulated them all, but my makeup organizer now has an entire drawer dedicated to all of my mascaras. As I was sitting down doing my makeup yesterday, I looked at that drawer, and thought it would be fun to share my favorites! I love all of the mascaras I own, but I narrowed it down to my top 5. I do have a drugstore honorable mention at the end, for those that are looking for something less expensive!

My top 5 are the mascaras that I nearly ALWAYS rotate in reaching for whenever I'm doing my makeup!


My Top 5 Favs:

  1. Lorac Pro Mascara
  2. Benefit Cosmetics They're Real Mascara
  3. Tarte Gifted Amazonian Clay Smart Mascara
  4. Too Faced Better Than Sex Mascara
  5. Mally Beauty Get the Last Lash Maximizing Duo Mascara
_________________________________________________________________________________

Let's start with the Lorac Pro Mascara, shall we?


I love to use this mascara whenever I'm looking for natural-looking volume. The wand is so unique, and the thickness of the bottom leaves my lashes looking so beautifully fluffy. The pointed tip makes it easy to separate, avoid clumping, and lengthen my lashes.


It is a lengthening, thickening professional mascara. It's smudge proof, and flake-proof. Only downfall: It's not waterproof. However, I have never experienced any panda eyes, or situations where it ran, and I'm a crier!

The Lorac Pro Mascara costs $23.00 at Ulta Beauty.

Next up, the Benefit Cosmetics They're Real Mascara!


It's so crazy to me that I've included this mascara in my top 5 favorites, because I wasn't sure about this one when I first tried it! I was gifted this mascara, and when I first used it, I did not like it at all. Whomp whomp. I'm not even sure why I didn't like it, I just didn't. So, it just sat in my mascara drawer, untouched for a while. 

I have seen countless beauty vloggers and bloggers use and praise this mascara, so I thought, "let me give it another try," and it has become a fav of mine! Maybe it caught me on a cranky makeup day. 

This mascara wand is so incredibly unique. It is a straight wand, but it has a little ball at the tip. Use the mascara as per usual: holding the wand horizontally and wiggling your way up. The staggered bristles grab close to the root, giving more length and volume. Then, go vertically: use the ball at the tip, filled with tiny precision bristles, to lift, define, and curl every single lash.

I use this mascara when I want a bit more drama with my look. I curl my lashes, and then apply two coats of this mascara, and I have beautiful, long, dramatic lashes! Unfortunately, this mascara is also not waterproof, but as I said for Lorac, I have never experienced panda eyes! 

Benefit Cosmetics They're Real Macara costs $24.00 at Sephora. If you want a try-before-you- buy, Sephora sells a travel size for $12.00! I've been thinking of trying the new Benefit They're Real in blue... how do we feel about this? Should I give it a try? Have you? Let me know! 

Tarte Gifted Mascara! I've talked about this mascara on my blog before. I mentioned it in a monthly favorites. As you can see, I am consistent! Haha


I own this mascara in a travel size, but I fully intend on purchasing a full size when I run out! This is another mascara I like to use for a natural, fluffy, volumized look with no clumping! 

This mascara is unique because it's infused with Amazonian Clay, like many other Tarte products! This mascara was created to offer long-term reparative, rebuilding, and strengthening benefits with each use. Amazonian clay also works to keep lashes hydrated and nourished to prevent fallout and brittle lashes. The amazonian clay also works to improve pigmentation and volume, making your lashes look brighter, blacker, longer, and more full! This mascara is not waterproof, but still no panda eyes happening.

A full size tube of Tarte Gifted Mascara costs $21.00 at Sephora.

On to the Too Faced Better Than Sex Mascara! 


This mascara is in the top 5 just for it's name alone! Just kidding, but how daring. I love it! 

This mascara is a fav among beauty lovers, and it's not hard to see why. I was so excited when I received this mascara in a kit from HSN a while back. 

It has a beautiful, hourglass-shaped wand that clings to every lash, long or short, that curls and lengthens your lashes, and has incredibly black pigment. I like to wear this mascara when I'm doing a smokey, vampy eye look and I'm looking for some plump, dark, intense, voluminous lashes. It just pulls a smoked out look together. Two coats on the top, one coat on the bottom, and this collagen-infused mascara has your lashes long, defined, and intense. I love it!!


Too Faced Better Than Sex Mascara costs $23.00 at Sephora. 

Finally, we have the Mally Beauty Get the Last Lash Maximizing Duo Mascara!


Mally Beauty is famous for its award winning mascaras, and this one does not disappoint! I cannot begin to express the perfection of this mascara. It's probably my favorite of the five. The volume and definition your lashes get with just one coat, it's insane! 

This mascara is probably the most unique of the five, due to its duel-ended wands with two different formulas for two different purposes. On one end, the maximizing wand is thicker, with a special formula for maximizing, volumizing, lifting, and filling your lashes. The thinner wand, for defining, has a formula created to define the curl of your lashes and keep it in place.

I apply this mascara by first, curling my lashes, and then applying two coats of the maximizing end, and one coat of the defining end to the top lashes; and then one coat of the defining end to the bottom lashes. I naturally have very long lashes, but this mascara takes my lashes to a whole new level.

If you need an idea of how amazing Mally Beauty mascaras are, I remember when I was backstage at the Rachael Ray show when filming my segment with Mally Roncal, after I got my makeup done, everyone backstage was asking me if they were my natural lashes, or if I was wearing falsies. That's the kind of reaction you want to a mascara! 

You can get the Mally Beauty Get the Last Lash Maximizing Duo Mascara for just $25.00 at QVC.com! 

On to my honorable drugstore mention... L'Oreal Paris Volumizing Original Mascara!

Before I got into more high end makeup, this mascara was my go-to. I LOVED it! It works great! Def one of the best drugstore mascaras, and for just around five or six dollars at Target? You cannot beat it! 

And there you have it! There are my Top 5 Favorite Mascaras, and one drugstore honorable mention! 
What are some of your favorite mascaras? I have many others, but I'm always looking for suggestions. Send them my way!

Until next time, have a wonderful week! And for those going back to school this week, best of luck! Wear a smile :)

Stay beautiful, 
Christina Bracco
xoxoxoxo

For PR inquiries, questions, comments, suggestions, please email Christina.f.b@aol.com or please fill out a Contact Form in the sidebar. Thank you. 

INSTAGRAM  <----- CLICK AND FOLLOW ME HERE!!

TWITTER <----- CLICK AND FOLLOW ME HERE!!